Building a home video studio can seem like a daunting task, especially if you’re on a budget. I built a small, simple video studio in my home this past year and it’s exactly what I needed to create videos for my online business.
How to Build Your Home Video Studio on Any Budget?
- Select a room with adequate space
- Shoot video using your phone, laptop or camera
- Capture audio using a lavalier or shotgun mic
- Eliminate shadows: stand by a window or purchase softbox lights
- Make your background distraction-free or use a green screen
How you build your DIY home video studio will depend on what type of video you plan to shoot. You may want to build a set for interviews, or you may plan on being the one person on camera. You may also decide to integrate screen recording software or use it exclusively. We’ll recommend several types of setups to meet your needs.
Things to Consider When Building Your DIY Home Video Studio
1. You Need Adequate Space – Preferably a Dedicated Space

You’ll need some elbow room in order to set up a small studio. Your studio will contain a camera, audio equipment, a computer, a background of some kind, and potentially lighting equipment, a desk, chair, etc. So, you’re going to need some space to make this happen. I’ve done a lot of research on this question and most say you need at least a 15′ X 15′ space.
However, for a small home video studio, I’ve been able to get away with using approximately a 10′ X 10′ space… Heck, once I used the corner of my bedroom. However, right now I’m using the corner/end of my family room and have been able (with the agreement of my wife) to make this a dedicated video studio space. As stated, a dedicated space is ideal but not required. If you plan to simply record video in front of a computer, then you need very little space to get started – simply a desk and a chair may do the trick.
A dedicated space for your home video studio offers many benefits:
First, is the convenience – the easier it is to turn on and record, the more video you’ll produce. There’s no need to set-up and tear down and then do it all again the next day. Again, its the ideal situation but its not required.
Secondly, your shots are going to be more consistent as your camera, lights, audio should all be in the same place today that they were yesterday. So, if you’re recording for a vlog you have on YouTube and you like to use a consistent intro – you’re all set from the start. You don’t need to tweak anything. Not to mention the greater efficiency of it all.
2. What Type of Equipment Will Do You need for Your Studio?
Your tools are going to depend on your job. Let’s break this down to better understand exactly what you’re going to need.
Recording Video: You can use your phone, your computer or a digital camera.
Most of us can get away with using our phones to record video. My phone, like most, records in high-quality HD video. I purchased myself a small tripod for my phone and its worked great for recording video. When recording, be sure you keep your phone in the horizontal positional to ensure your video can be viewed in a widescreen.
My computer also has a camera which works okay. I’ve used it from time to time to record video when I’m seated at my desk. My computer’s

camera works fine but I’m tied to my desk of course as I’m not going to carry around my computer with me like a camera. However, when you’re first starting out, using your computer or phone is a great alternative. Its free – use what you’ve got.
We also have a Canon T3i camera and it works great for video. So, I’ve tried these 3 cameras and they all work well. Video with the Canon, of course, looks best but you need to understand something about all the camera options to ensure you get a nice product. My suggestion – start with what you have and work up from there.
| Video Option | Cost |
|---|---|
| Camera on Phone | Free if you own one |
| Webcam on Computer | Free if you own one |
| Digital Camera | $300 - $10,000 |
Capturing Audio: Audio often takes a “back seat” to video but its a very important piece – equally as important as video.
Make for certain that your subject sounds good. It’s disappointing (irritating) to locate a great video on a topic you’re interested in but the audio sucks. Most people get annoyed with bad audio and look elsewhere for what they need. If you’re going to be seated at your computer, consider a USB or XLR microphone or a lavalier mic that will clip to your collar.
If you plan to stand up or possibly take your gig on the road, then possibly a shotgun mic would work best. Check out your options and see what feels right.
| Audio Solutions | Comments |
|---|---|
| Phone's Internal Mic | You can use your phone's internal mic but there are better solutions. Free. |
| Computer's Internal Mic | You can use your computer's internal mic but there are solutions that are not expensive. Free. |
| Lavalier Microphone | Small mic you can pin to your lapel. Allows subject to be hands-free. Wireless versions can be expensive while wired versions can keep you on a leash of sorts. Inexpensive and I use one. |
| Shotgun Microphone | Highly directional and must be pointed at the target. |
| USD or XLR Microphones | Great for adding audio to screen recordings on your computer |
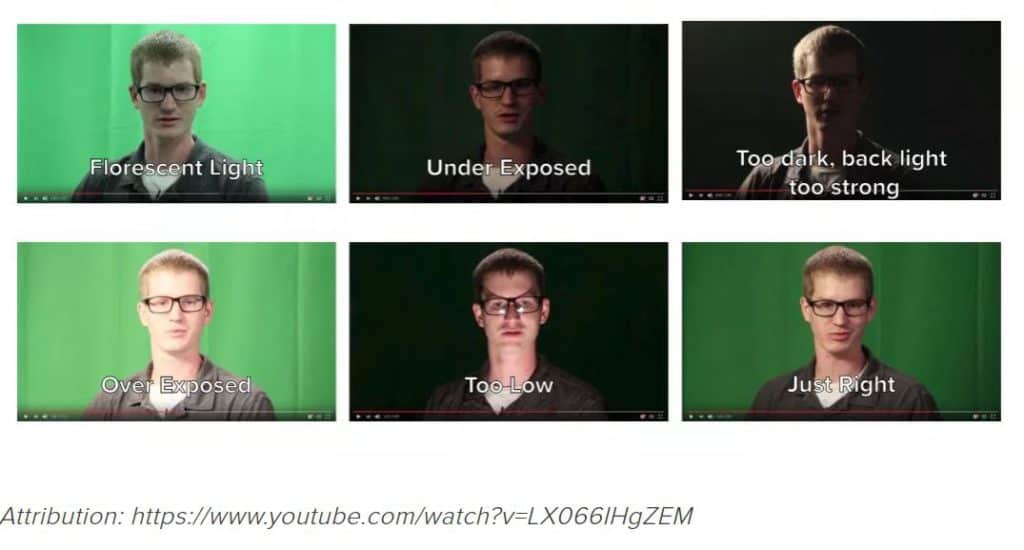
Video Lighting: It is very important to get the lighting right.
You don’t want shadows or light reflecting off your subjects face or background within your video. Use natural light if you must by standing near a large window. You don’t want the sunlight directly on your subject’s face but the stream of light from the window can light up your room enough to give you some great shots. You also use artificial lighting to supplement natural light if it’s needed.
Beware of skylights and completely uncontrolled light as you don’t want your subject to be “washed out” on camera.
If you’ll need to shoot video outside sunlight hours or on extremely overcast days, you may want to purchase artificial lighting. Softboxes can be purchased for less than a $100 and it can help take your video shoot go to the next level.
Regardless of what tools you use, you simply want to ensure that your subjects face is the focus. You don’t want any shadows but you also don’t want the person to look “washed out”.
Video Background: Your background can make or break your video production.
A distracting background can cause the viewer to completely miss what you’re saying and tune you out. A neutral, simple background will be just fine. Be sure your background matches your topic. You don’t want to necessarily talk about car repairs at a 5-star restaurant – I think you understand my point. You can also use a green screen to project an image behind you or purchase an inexpensive background that looks like a brick wall or flower garden or a mechanic’s shop. Almost anything is possible here. You’ll be limited only by your imagination.
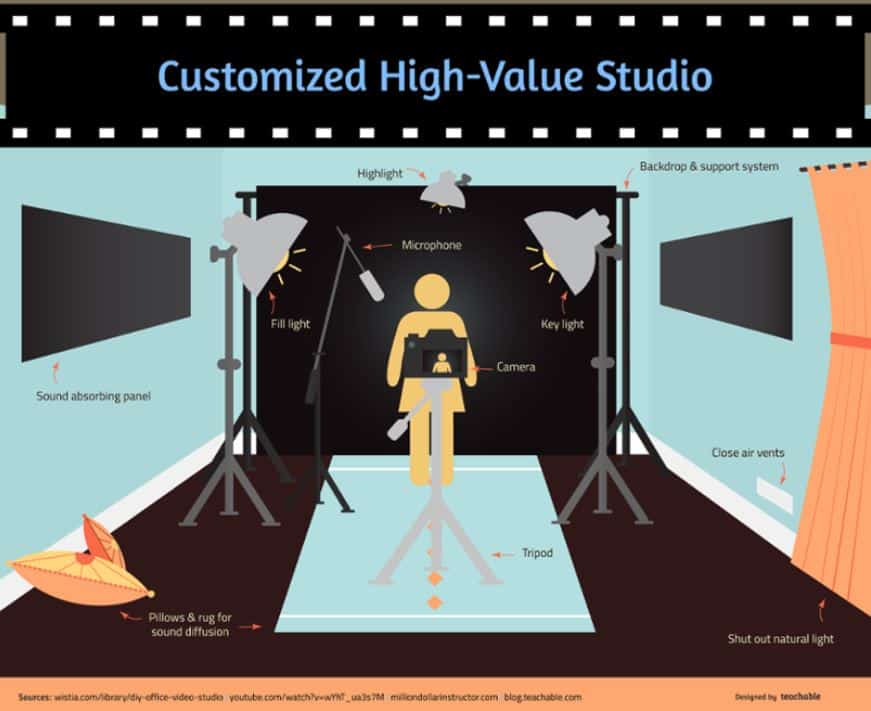
Your Home Video Production Studio Layout
See the infographic below that provides a great visual as to how your studio should be set-up.
The camera is of course front and center in front of your subject. You’ll note that we’re using 3 point lighting with 2 softbox lights on either side of the subject with a light behind the subject. Here we’re using a shotgun mic on a tripod and a black background.
The mic you use and the background you decide on as well as the other components represented here are completely up to you but this gives you an idea as to where everything should be placed in your new home video studio.
 blog.teachable.com
Related Questions
How to Record Voice with Android?
- Select and download a free app like Easy Voice Recorder
- Install and open on your phone
- Give your recording (.wav file) a name
- Click the microphone to record
- Record your voice as needed
- Click on the check mark when finished
- Share or save to the cloud
What About My Video Studio Lighting Setup?
Setting up your lighting is extremely important. A 2 or 3 point lighting system works most effectively and really makes your subject “pop” on video. Don’t ignore lighting issues as they can be easy to fix. Natural light can be combined with artificial light to create a nice effect.
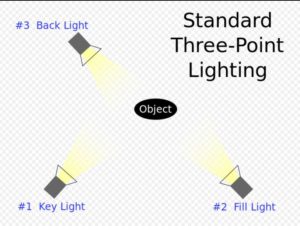
How Do You Setup Three Point Lighting?
First, the key light is placed at a 30% angle to the front right or left of the subject. Then the fill light is used on the opposite front side at about half the intensity to fill in shadows on the subjects face. The backlight then shines on the subjects back separating him from the background.