Launching out into the world of YouTube and video creation has its learning curve. One important aspect of video creation is lighting. After doing some research and experimentation, I’ve learned that 3-point lighting is the most foundational method for creating professional lighting for your online videos. This article is written in the context of 3-point lighting for video creation and YouTubers. This method takes your videos from “homemade” to “pro”.
What is a 3 Point Lighting System?
A lighting technique used to wrap your subject in light from 3 separate points of light. Used in video, photography, and other media, 3-point lighting consists of a primary key light, a fill light to “fill up” shadows and a backlight providing depth.
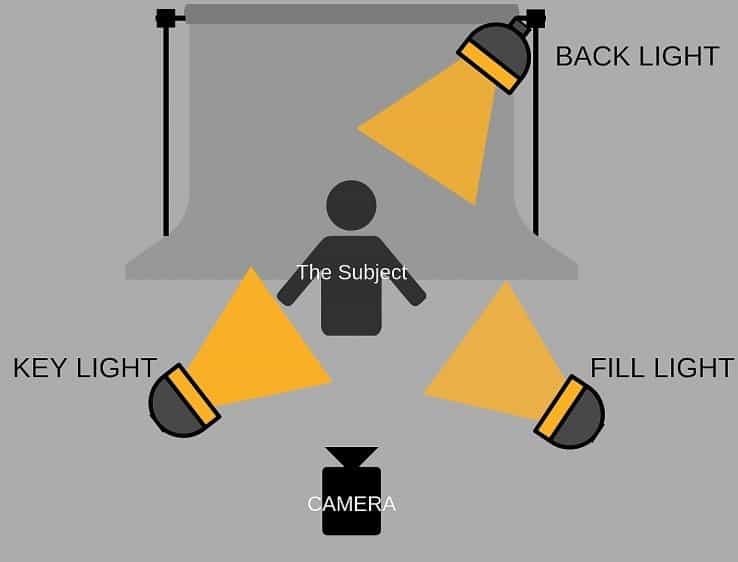 Three-point lighting is a foundational lighting technique that you can learn to master over time. However, its easy and anyone can learn how to do it. We’ll discuss the purpose for each point of light and how to master each. We’ll touch on a variation of this technique along with related topics such as adding a fourth light and the use of natural light and much more.
3 Point Lighting
Key Light
Fill Light
Back Light
The Key Light – What does the Key Light do?
The first and most important source of light used in photography and cinematography, the key light illuminates the subject. The key is normally the most intense light and is used to highlight the dimension and form of the subject in 3-point lighting.
 As in nature, our world has one primary light source, the sun. The key is like our video shoot’s sun in that it is the primary source of light responsible for lighting our subject.
In fact, the sun is often used as a primary light source in photography and videography today. The use of natural light is a legitimate light source but one that is not as easily “controlled” and can be volatile.
Well, the key light used in 3-point lighting can be anything. You can’t go to a store and buy a “key light” or a “fill light” for that matter. The term key light just refers to your primary light used in the video shoot.
As stated above, the key light can be anything. It can be a can light on a stage, a softbox light in your home studio but it can also be the sun or a household lamp.
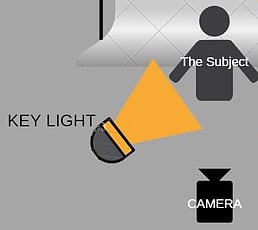 Typically, the key is the first light and most important light in the video shoot.
Most often, the placement of the key light is at a 30-45 degree from the subject. This placement is ideal as you don’t want your subject looking into a light when looking into your camera as they need to squint just to look at the camera. The angle is also important as it provides dimension and form to your subject. By lighting your subject at an angle you’re providing a 3D appearance, whereas lighting placed in front of your subject will make them appear more flat.
The key is placed just outside the frame but closer to your subject than the other lights. Typically, the key is positioned on your subject’s face. It separates your subject from the scene.
Some other cool features of a key light are that shadows created by the key light can have a three-dimensional aspect to the overall scene.
My lights came with a 135-watt bulb. However, not all video shoots are the same. You may need a bulb with less wattage or even more wattage.
A quick tip, you can achieve a natural look by using softer lighting for both your key and fill lights. Most don’t use this technique, but it provides an “open window” or naturalistic look.
The Fill Light – What is the Purpose of the Fill Light?
The second light in 3-point lighting used in photography and cinematography, the fill light is used to fill or illuminate shadows created by the key light. The fill can be supplied by artificial light or natural light by way of reflective material.
If your goal is a more natural look rather than style, then you’ll need a fill light.
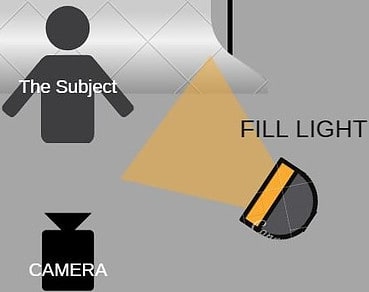 While the key light is the primary source of light on your subject, the fill light is what is used to control the shadows on your subject’s face. The fill provides balance to the key light by filling in the rest of the subject’s face with light that is softer and less bright than the key.
The fill light is the secondary light source for your video shoot opposite your key light. The fill light softens and extends the illumination provided by the key light.
In most cases, your fill light should be one quarter to one half the brightness of your key light. However, this can fluctuate based simply on the vision for your video shoot.
The fill light should be set up at a lower height than the key at approximately the same height as your camera. Many will set up the fill light across from the key at the same angle in relation to the subject. However, try setting up the fill at a lesser angle of approximately 20-25%. I think you’ll like the effect.
The Effects of Light Location and Distance from the Subject
You don’t want your fill light to create any shadows of its own. This is why your fill light should always be diffused.
Moving the light source closer to your subject will lighten the shadows while moving it away makes the shadows darker. That being said, a dim fill light will provide a more harsh shadow from the key, while a brighter fill light will help give your subject a more even look.
If you choose not to use a fill light, the result can be a stark contrast (due to shadows) across your subject’s face depending on the key light’s brightness.
Light Sources for your Fill Light
You can use natural lighting or artificial lighting to complete the task of a fill light. Artificial lighting can be in the form of a softbox light, a household lamp or any other type of lamp or light.
Reflectors can also be used such as a mirror, cardboard covered in foil, white cardstock, and the like. These reflectors work to redirect the key light back upon the subject from a different angle. This type of light is often softer and subtler than another lamp.
The objective is not to remove all shadows, but just to reduce them so you have a smoother transition from one side of the subject’s face to the other.
The Backlight – What is the Purpose of the Backlight in 3 Point Lighting?
The backlight creates a glowing rim of light around your subject’s head and frame by illuminating her from the back. This light is placed behind and above your subject’s head at a 45-degree angle and helps to visually separate her from the background.
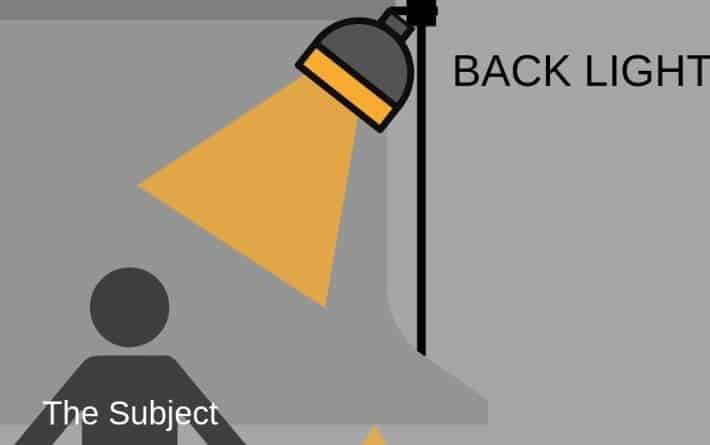 The backlight is known by many names, such as the rim light, hair light, a kicker light, and others. However, its function is simple… The backlight faces the back of the subject for the purpose of creating a glowing effect on the edges of the subject, separating her from the background.
Some people shy away from using a backlight as people don’t walk around with a halo on their head. However, I love using backlights as I love the final product!
So, how do you set up a backlight? Position a light a few feet above the subject’s head but behind her, so the light will shine on her hair and shoulders. The height is important as you don’t want the backlight to appear in the frame. However, the height of the light will also cause the light to shine downward at approximately a 45-degree angle, creating a light rim around the subject’s head, shoulders, or frame.
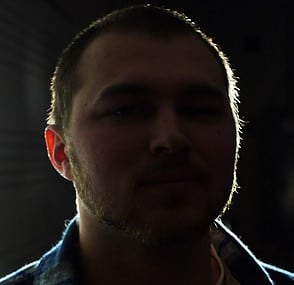
You don’t want your backlight or rim light to provide any illumination to the front of your subject. However, don’t be afraid to move the light around to get the desired result you’re looking for.
The backlight is most often a spotlight. Using barn doors on your light can help as it will focus your light without having the light beam back into the camera lens.
It’s not uncommon for the backlight to be as strong as the key light. However, the most common key-fill-back ratio would be 2:1:1.
Keep in mind that a person with blonde hair will reflect more light back to the camera than that of a person. This is just one example of why you may need to tweak the intensity of your lighting outside the norm.
More Information
Preparing For Your Video Shoot
Unless you have a permanent video studio, its best to scout out your location prior to the video shoot. Its always good to consider what amount of natural light is available in the room (if the shoot is inside). Also, weather can affect your video shoot for obvious reasons, one of which is lighting. I try never to DEPEND on natural light as it can change in a moment’s notice. However, when available using natural light can be beneficial.
A few other questions: does the room have skylights? Any windows? Is it painted with dark paint? How large is the floor space? What will I need to bring along with me?
Why is 3 Point Lighting Important?
This lighting technique is foundational and proven. The 3-point lighting technique has been around a while as it started in the theatre where 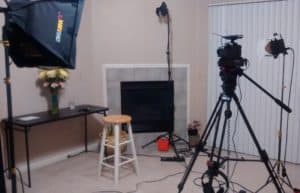 stage actors faces were difficult to see due to shadows. After perfecting this technique, you’ll venture out into various experiments to get the look you think is ideal.
Start with this foundation of lighting. A great first step is to jump in and give it a try on your next project. This is a great place to start and then build on.
To the left, you’ll see our first attempt in our living room a few years ago. It was the perfect attempt but we got the ball rolling and have grown since that time.
Selecting Lighting Options
Pulling together a set of lighting doesn’t need to be expensive. You can utilize natural light and some of the lighting you probably have sitting around the house. However, if you’re building a home video studio or set of lights to use on the road, you’ll most likely need to purchase a set of lights. Again, this doesn’t need to be expensive. You can purchase a lighting set for less than $100 on Amazon.
If you’re purchasing lights, you’ll have to answer a few questions prior to purchasing your lighting.
- Your budget – How much money do you have to spend or how much should you really spend on lighting.
- Your project or purpose – Will you be producing YouTube videos or stylistic movies? Is this one project or a permanent set-up?
- Your environment – Is this a room with skylights and a huge bay window, or a room with no access to natural light? Are the walls white or a dark color?
Check out a DIY home video studio lighting recommendation on our product page.
Related Questions
What Type of Light is Used as a Fill Light?
A fill light is most often diffused light provided by a daylight bulb. Many recommend a 500-watt bulb for your key light, 250 watts for the fill and about the same (250) for the backlight. However, the wattage required will depend on your project and environment.
What is a Catchlight?
The reflection of a light source in a subject’s eye, creating a mirrored effect. It’s that glimmer of light in your subject’s eyes. Also referred to as an eye light, a catch light adds dimension and depth to the eye and is said to give the eyes life.
What is 4 Point Lighting?
The setup is the same as 3-point lighting with the addition of a fourth background light. The fourth light is placed behind your subject typically on the floor and projects up into the background behind your subject. The light adds further depth and separation between the subject and the background.
