Not long ago I started researching what equipment was needed in order to create a YouTube video for one of my websites. I did some research and was surprised to learn how easy it really was to get started, even for a beginner.
Required YouTube Equipment for Beginners
- Shoot video with your phone, laptop or camera
- Capture quality audio with a second phone or with an external USB or XLR microphone
- For awesome lighting, stand by a large window for natural light or purchase a couple of softbox lights
- Use video editing software to perfect your videos for the web
Through this process, I’ve found that I didn’t need to be an AV (audio video) junkie to create quality videos for YouTube. I also didn’t have to spend $1000’s of dollars in order for my videos to look good. I just needed a few tools in my toolkit to get good results mixed with a little “know how”.
What You Need to Get Started with YouTube as a Beginner
1. You’re Going to Need a Camera In Order to Shoot Your YouTube Video
You’re going to need a camera unless you’re just planning on doing screen recordings (we dive into that further down into the article). You 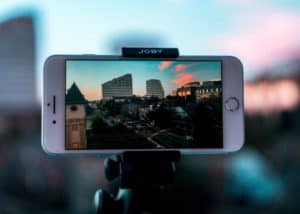 could use the camera on your laptop or smartphone. Many don’t realize that you can use your smartphone to record good quality video and the end result can still look professional.
When using your phone, you’ll want to position your phone horizontally to create videos with a widescreen. Honestly, it can look great and most won’t notice the difference. In most cases, the smartphone you hold in your hand has a better camera than the average camera at your local retailer.
If you choose to use your laptop’s camera, the subject of your video shoot will most likely need to be seated in front of your laptop and not a distance away or moving around. It can be restricting but maybe that won’t matter for what you’re wanting to do. This method can work out well at the very beginning and can save you money!
We use a Canon Rebel T3i and it shoots great video. When I first started, I used my laptop’s webcam and then switched over to my smartphone to gain some mobility and greater quality. At times, I still use my smartphone to add a second perspective or even b-roll to my video shoots.
If you’re determined to kick this up a notch, you can purchase a camera. However, I don’t believe you need a camera any better than your smartphone or computer from the start.
But this one thing is true, you’re going to need some way to record video… great looking video. So, what to choose?
You can make your online videos look great if you’ll add some of these other components below to the mix. So, save your money for now.
2. Good Video Production Requires Good Audio
It goes without saying that any video has two fundamental components: the visual and the audio. However, oftentimes, the audio portion of the recording can be neglected or subpar. Videographers like to focus on the visual stuff – like lighting, a cool background, and the like. However, getting the audio right isn’t all that difficult or expensive.
Most computers and phones come with a built-in microphone. Your phone’s microphone might be exactly what you need at the start but it’s not going to be your best option in the future. If you’re going to use the mic that is built into your computer or phone, ensure that your subject is as close to the mic as possible. However, I wouldn’t recommend this approach.
What’s in your toolbag? The tools you’ll need depend on what job you’re doing. Are you doing a video shoot with a subject front and center or possibly an interview? Do you plan to record in your studio or outside? Are you simply doing a screen recording with a voiceover after you record? There’s a lot to consider and not one easy answer.
Things to Consider with Regards to Audio:
- USB or XLR microphones – Can be perfect for voiceovers or on-screen recordings.
- Lavalier microphones – Provides your subject with a little freedom as they won’t need to be concerned with staying close to the microphone. A lavalier simply clicks on your collar and you’re ready to roll. You can purchase chorded mics or chordless which can be pricey.
- Shotgun microphones – Work best for interviews, vlogging but are utilized best outdoors. These highly directional mics need to be pointed directly at your subject. If you can afford to spend a little money (maybe $20-30), you can use an external microphone like a lavalier or handheld microphone. These items aren’t that expensive and you’ll probably use them for years to come.
3. Lighting is the Key to Great Video Production
You may be asking yourself, “why would I want to purchase lighting if I have access to natural light?” Its true, you can use natural lighting for your videos while standing large window in your home or office. This is a great way to start but you have to get this just right. Using natural light causes limitations as you can only create your video shoots during certain times of the day… for that matter only on certain days if it’s too overcast outside. We can talk more about this in future articles and videos.
You also can focus lamps you already have when you first start to ensure you have good lighting. It is important to remember not to shine too much light on the subject as the person may look “washed out” on video. When you’re first starting out you may want to take the free route to save money. However, using the house or office lamps isn’t easy and using natural light can be limiting as you have to “catch” the sun at the right time of day.
This is the reason I invested a small amount of money in lighting. You can find something online for less than $100 right now and your video shoot will only be limited by your availability to electricity rather than daylight hours. I have friends that create YouTube videos with a $20 lamp and the video looks fine.
I have another friend who was convinced he needed a new camera as he was very unhappy with the quality of his video recordings. However, he quickly realized that the issue was his lighting, not the camera quality. Expensive cameras are great but lighting can make your videos “pop”! Shooting professional videos is all about getting your lighting right. If you do it right, you’re sure to impress!
Lighting can get expensive, however, it doesn’t have to be! Here are some options:
- Natural light or lamps from around the house
- Controlled lighting with a 2 softbox lights
- Controlled lighting with 3-way lighting – 2 softbox lights and a 3rd light behind your subject to make them “pop”
4. Video Editing Software Can Make Your Videos Stand Apart from the Rest
Once you have your video and audio saved on your phone, camera, or other devices… now what? Well, you can upload a video with audio directly from your phone to your YouTube channel. However, you might want to edit the video to produce something professional in appearance. You’ll need software for that task.
There are video editing apps for your smartphone that do a good job. However, I would recommend video editing software for your computer as you have more versatility and options than you would with a phone app. However, there is something for everyone! Check out our list of recommendations here.
You Need a Background Check Before Shooting Video
Beginners may want to go without a custom background. You can sit in front of your webcam on your laptop and create video all day long with whatever is behind you. Here are a few tips/ thoughts if that’s your plan:
- Regardless if you’re shooting video inside or outside, you’ll want to ensure that your background is not distracting to your viewers. Ensure that what is behind the person in the video shoot is not more interesting than what is being communicated in your video.
- Create a set in your home video studio from things you have around the house
- Purchase an inexpensive background online I that can create the look and feel you want
- Buy a green screen or create your own to project something you want to see in your background
- Blur your background – a bit more advanced but something to consider
- Get creative and create an interesting background for your shoot
Do I Need a Tripod to Record Quality Video?
Videos should be shot at the eye level of your subject. So, tripods help hold your camera steady but also help you get the correct height for your shots. You don’t necessarily have to have a tripod but it’s going to make things a lot easier for you unless you’re using your webcam… which brings me to my next point.
If you’re using a webcam, then you just need a box to prop up your computer. If you’re going to be using your phone, you could lean your phone against something to get the perfect shot. Back when my wife and I purchased our phones, we purchased phone cases with a kickstand. I’ve used this a few times for recording video but the angle is difficult to perfect, which requires me to add books or magazines under the kickstand…. all of which takes time. This is why I purchased a very inexpensive tripod for my phone and I love it. A simple tripod can save you time and aggravation… all while you get the perfect shot.
See these tips for shooting video without a tripod:
- Always shoot video with your phone in a horizontal position to create widescreen shots
- Use two hands to ensure your video isn’t “shaky”
- Pull your elbows into your body to help stabilize the shot further
- Prop or lean your camera on something nearby to ensure you have the best camera angle
When we’re using our Canon, we, of course, use the tripod we purchased with the camera. You don’t need to spend a lot of money on this stuff but it’s going to make your video creation experience much easier and quicker. You definitely should consider investing in a tripod for a video created using a smartphone or camera.
Best Free Screen Recording Software
Screen recording is when you record what is shown on your computer’s screen. Screen recording software makes it easy to record and share footage directly from your computer. YouTubers use screen recording software to show off their gaming skills to the world or train others on how to use software or to put together a demo for a client.
Some screen recorders are simple and don’t offer a lot of extras. Yet others offer bells and whistles like video editing, picture in picture, live streaming and so on. However, some free tools have watermarks that show up in all the videos you create/share but you won’t know about them until you’re finished with your project… so you’ll want to avoid these tools if possible.
There are several different resources on the market now and things can get confusing as to what you really need for screen recording. Check out our list of screen recorders.
Related Questions:
What are the Important Audio Questions to Consider Before You Shoot?
- Do a soundcheck by recording test footage to ensure everything is working as it should.
- Eliminate background noise to remove distractions
- Clap your hands loudly to clearly mark the beginning of a scene. This is used during the video editing process to help you match up video with audio.
How do I Get Started on YouTube?
A few simple steps to get you started:
- Get a clear direction or focus
- Create your YouTube channel
- Customize your channel
- Make some videos. Enuff said.
- Group your videos together with Playlists.
- Share your content.
- Interact with followers.
- Create annotations
- Connect and verify your website
Can I Vlog with my Phone?
Create a vlog using your phone as most come with an HD quality camera. Invest $20 in a tripod to hold your phone for that perfect shot. Finally, ensure high-quality audio by using an external mic like a lavalier and then edit your video directly on your phone with one of the many editing apps.